Tuesday, July 23, 2013

Mid-Summer Square Foot Garden Update


It has been a while since I updated my square foot garden journal.  I have been out of the country visiting my daughter who lives in the Arabian Peninsula.  I left my garden in my husband’s care and it was looking quite nice when I returned from my adventure in the desert.   I left my red checked Better Homes and Gardens New Cook Book (which I received as a wedding gift in 1979) open to the vegetable freezing time chart as a slight hint for my husband.  He noticed the hint, but simply laughed.  Thankfully, there wasn't enough harvest to need preserving/freezing.  I had thought my corn might get ready while I was gone, but it appears my corn did not make at all.   The stalks look great, but the ears never matured.
Cornstalks looked healthy.  
The ears did not develop very well.
This is one of the bigger ones. 

Most of the ears are small like this one.

This is one of my sad little ears of corn.

 If anyone can tell me why this happened I would be interested in your thoughts. Could a lack of water at the proper time be the reason. I wasn’t here to keep it watered and I know my husband was very busy working night and day at his job.  He watered when he could, but it might have not been at a strategic time.  Of course all my square foot garden naysayers (along with my husband) are blaming my soil depth of only six inches.   Has anyone else in Texas had success in growing sweet corn in only six inches of Mel’s Mix?  Technically, it is Brenda’s Mix.   Living in a rural area, I had difficulty finding five varieties of compost like Mel recommends so I am wondering about the balance of my soil.

 On the upside… My squash plants are going crazy.   Since I was gone, I did not get a chance to train them to grow vertically, so they are growing everywhere.   I really was doubtful I was going to get the plants to grow vertically. I have lots of squash plant for the amount of fruit produced.   I never did a soil test, so perhaps I have too much nitrogen in my homemade soil.   Other plants seem to be doing great.  Everything has just overgrown its assigned space.   My eggplant plants have disappeared underneath the squash. 

I planted two squash plants with zinnias and marigolds.
  I was gone when I should have been training my squash to grow vertically.
By the time I got home it was too late. 

My pole beans seem to have the same problem as the squash. Good plant growth, plenty of blooms, but never enough mature beans to pick a “mess” of beans on one day.  (Does anyone know where that term “mess” of vegetables originated?)  I had to harvest green beans for a week to have enough for two people for one meal. They were delicious though.  Someone with more experience with the SFG method needs to let me know if my expectations are too high.  


While my squash and beans have produced moderately, my grape tomato plant has done better than expected.   The plant is huge and the harvest is plentiful.   So, I ask myself, why won’t my green beans produce more beans?


Saturday, May 11, 2013

Growing Vertically - How to Build a Vertical Trellis for Your Square Foot Garden


Growing Vertically,

I just love my vertical trellises.   Once again I followed Mel’s instructions, and I am here to tell you that so far they are working great.  And they were so easy to build.   It is still early in the season, but they seem to be sturdy enough.   We made one modification to his plan.   Instead of tying all the little ties on each square of the nylon vegetable trellis to the frame, we purchased zip ties and used them to attach the nylon trellis to the conduit frame.   I have to admit this was my husband’s idea and at first I was a little skeptical, but indeed it was an excellent idea!   I did not relish tying each little square on the nylon trellis to the frame.   I believe this idea may also make it easier to take down at the end of the growing season.  I am hoping that the nylon trellises are sturdy enough to reuse next year.  


Look closely and you can see the rebar at
the corner of the raised bed. 


Conduit Trellis Frame


How we made our vertical trellises:  

Materials needed for one trellis:
2 - 6 ft lengths of electrical conduit
1 – 4 ft length of electrical conduit
2 – L - shaped conduit connectors
2- 4 ft length of rebar (Mel recommends 18 – 24 inches.  I may try the shorter length in the future.)
1 – nylon vegetable trellis
I purchased all the materials at a local home and garden center.  The conduit came in 10 foot lengths, but the garden center cut it for me into the lengths that I needed. 
To construct the vertical trellis I began by attaching one of the connectors to each end of the four foot conduit.   In order to position the rebar supports in the right place, I laid the four foot piece of conduit on the ground where I wanted my trellis and then using a hammer I drove the rebar into the ground about 1 – 1 ½ feet deep.   Next I slid one six foot length of conduit onto each rebar.  To complete the conduit frame I simply connected the four foot length of rebar to the top of the six foot lengths.   The connectors that I purchased had screws that I easily tightened to secure the two pieces of conduit to each other.   The final step was to hang the nylon vegetable trellis to the frame.   My trellis was bigger than my frame so I had to trim it to fit.  As you can see from the pictures, so far it is working great.
I still need to build a few more, but this project took less than 30 minutes to build.     

Friday, April 26, 2013

Best Square Foot Garden Ever!


I have never planted a garden and had such success as I am having with my square foot garden this year.   I am convinced that the secret is the homemade soil, Mel’s Mix!   The soil is so wonderful.  It is like the perfect soil.   I keep meaning to test the soil to see if it has all the right nutrients, but so far everything is growing so well that I have not slowed down and conducted the test.   I just want to share some pictures I took this afternoon to show you what I am talking about.   


You are looking at lush brussel spouts and cabbages.


Cabbages, lettuce, spinach, pole beans, and red potatoes!

I harvested spinach today.   This was my spinach squares just before I picked them today.   This was my second harvest.


Two of my four spinach 12 inch squares just before harvesting!


My potatoes have reached the top of the box.   I may only have to add soil one more time or maybe not.   They look beautiful and healthy.  On one of my Internet browsing journeys I read where some people grew potatoes in a box or container and all they ever got was a beautiful plant above ground, but no potatoes below ground. I sure hope that doesn’t happen here.   Waiting for my potato harvest will be like waiting for Christmas morning when I was a little kid.

I will probably add more soil one more time.
The potatoes will have 18 inches of soil to spread their little feet!
 

  My brussel sprouts are finally starting to produce sprouts!  
It's a baby brussel sprout!
 

One whole 4x4 square has been dedicated to GS90 Sweet Corn!   Sweet little corn seedlings peeked their heads through the soil this week and they are shooting up quickly.    Once the corn gets a little bit taller I am going to build a horizontal trellis to use a support for the corn.
 
If you look really close you might be able to see my corn shoots
 planted four per square.


Sunday, April 21, 2013

Growing Potatoes in a Square Foot Garden


One of my favorite homegrown vegetables is new red potatoes cooked with fresh snapped green beans.   For the past several years I have had to rely on my brother-in-law to supply the potatoes.   This year I am raising my own potatoes in my square foot garden.   Since my raised beds are only six inches deep, they are too shallow to grow potatoes.   My husband built three 12 x 12 inch boxes from some scrap wood we had left over from rebuilding our deck.  I am really proud of my potato boxes.   Good job honey!  You really are becoming a pretty good carpenter. 
 

We placed the boxes over the three squares in my SFG where I planted my potatoes.  They fit perfect.   As the potatoes grow taller above the soil, I have been adding more soil.   The potatoes have grown almost to the top of the potato box.   Hopefully, when it is time to harvest, the potato boxes will be full of new red potatoes.   

Potato Boxes

As the potatoes grow, I add more dirt (Mel's Mix).


Thursday, April 11, 2013

Ridding my Vegetable Garden of Fire Ants


Battle of the Ants!
 
 
I have been at war.  The enemy…Fire Ants.  When I first discovered fire ants invading my garden, I realized I needed to take action immediately. !    If fire ants invade my lawn I know what works, but that solution would not work in my vegetable garden.  I needed to find something safe and nontoxic.   On one of my favorite gardening forums, Garden Web, I learned several interesting suggestions for ridding your vegetable garden of ants.    I cannot speak to the validity of any of these methods except the two I tried.  

Ways to Rid Your Vegetable Garden of Ants-

Orange Oil
Instant Grits
Dry or Gardening Molasses
Coffee Grounds
Cornmeal
Sugar
Diatomaceous Earth
Pots of boiling water
Ant Poison with the active ingredient Spinosad

Being a true Texan and a former 4-Her I knew the Texas A&M extension service must have some valuable information for battling the pesky little critters.  I have included the link to their fact sheet.  It was interesting to see which of the above suggestions from the garden forum were actually on their fact sheet.  I was surprised to actually find boiling water on the A&M Fact Sheet.     


I treated the infested area twice with cornmeal and although it seemed to slow the ants for a day or so, they never vacated my garden.    I treated the ants this past weekend with poison containing the active ingredient Spinosad.  On Monday there were still a few ants crawling around, but not many.   If I see any more ants I may try the boiling water method next.  


Cornmeal treatment for fire ants slowed them down,
but did not eradicate the pesky fella's.


Sunday, March 31, 2013

My First Harvest


Woo-Hoo!  My lettuce is ready for harvest.   I am really excited to begin harvesting my first crop.  Fortunate for me this comes right in time for my new resolve to eat healthier and to eat fewer calories.  What better way to do that then eating a lot of salad.   Fresh home grown salad!

As excited as I am about my garden, I visited my sister’s (row garden) today.  She had some beautiful kale growing and already had fresh radishes.   I haven’t even planted radishes.  I bought the seeds, but the package instructions said to plant two weeks before the last frost.  That means it is now time to plant.   She does live 45 minutes south of me, so maybe that is why she got to plant earlier.  Hopefully, I can plant radishes on Monday. 

I cannot remember a spring with so many low temperature days this late in the year.   It is great for my spring crops as long as the temperatures don’t suddenly jump to 85 degrees.  I had to cover my garden several nights last week as the temperatures dropped into the low 30’s but this week seems to promise warmer spring weather. 

Replants are a success!
 I replanted my spinach since it wasn’t coming up.  I suppose the other seeds were still there just waiting for warmer temperatures or something, because now I have many spinach seedlings coming up in a totally random arrangement, not the well thought out and researched square foot garden plan.  I will have to thin them soon.   I also had to replant my sugar snap peas and this time I am not disappointed.

Thursday, March 21, 2013

Phase II begins!


God blessed my little garden with rain while I was away today.    More rain is in the forecast.

I began phase two of my square foot garden during my spring break and I am very excited.  Adding three more 4x4 squares completed this year’s garden design.  My square foot garden design now has four squares on the back and two squares on the front. 
I am waiting until later in the spring to make more dirt and fill the new squares because I just don’t trust myself.  If I have dirt I will not be able to resist planting my summer crops.  I think all the garden centers get their plants too early on purpose.  They know we can’t resist them.  We buy them, plant too soon, and then we have to purchase more plants because the first ones succumb to the late spring frost.     
 Our last frost date is still three weeks away.  I will be patient, I will be patient, I will be patient!  


Another task we accomplished during spring break was mulching the walkways between my squares.  First, I covered the walkways with Scotts Pro Weed Block.   Then we bought 20 bags of cypress mulch and spread it between the squares about two inches deep.   Even with 20 bags we ran short.  I thought I had a picture of the mulch, but I guess I was wrong.  I will post a picture later. Perhaps you can imagine the black weed block covered with cyprus mulch. 

I am undecided about what I want to use to hold the mulch in place on the outside walkways.   I am thinking about planting marigolds or dianthus around the edges instead of using man-made edging.  Marigolds would be good because I know they deter garden pests, but the dianthus will be good because they will come back each year. 
 If anyone has suggestions for what to use for my garden edging, please share your ideas!
 
Spring Crops are making progressing!
 
 I wanted to share the progress of my Bibb lettuce.

 Bibb Lettuce planted from transplants February 24.
                                               

Bibb Lettuce - March 21
I am thinking salad for supper soon!  I better get the radishes planted!


Tuesday, March 19, 2013

Warmer Weather Making a Difference

March 19, 2013

Tomorrow is the first day of spring and we are finally getting some typical Texas spring weather.  These warmer temperatures are going to help the garden grow!

A lot has been happening and not happening in my garden since I last posted.   The mesclun seeds (often called spring mix in the store) are sprouting and coming along nicely. The mesclun squares are going to be interesting because when I first planted them I did not label the squares.  Having forgotten what was planted in those unlabeled squares; I planted a second variety of spinach and then realized that I already had mesclun planted there.   I now have mesclun and spinach coming up in the same square.   I am going to give it more time before I do any thinning.  They are just tiny babies right now and they all have plenty of room to grow.   Since I have never grown mesclun from seed this is a new adventure for me anyway, so I will just watch and wait to see what could happen over the next few weeks. 


What is not happening is the sugar snap peas are not sprouting.    I have two peas that sprouted on time.  I dug under the ground to see if there were others trying to come up but I could only find one, so I have replanted sugar snap peas.   I have also had trouble with the spinach squares sprouting.  I replanted the spinach also.   I soaked the seeds for a few minutes this time to see if that would make a difference.  I am also trying to keep the soil more evenly moist.  I may have let my soil dry out before. 
Dry soil does seem to be my biggest problem.  I am wondering if I have made my Mel’s mix correctly because it is not holding moisture very well.   

My lettuce, broccoli, cabbage, and brussel sprouts are all growing and looking very healthy.  

Wednesday, March 13, 2013

Seedlings Appear!


Spring break has arrived and with it we finally have some decent Texas spring weather.  It was wonderful to work in the garden without wearing my husband’s camo coveralls.  I accomplished a great deal in the garden, but I am most excited about the emergence of a few seedlings.   I have a couple of spinach seedlings peeking their heads above the soil along with one little lonely mesclun seedling.   I also have two sugar snap peas emerging above ground.   Hopefully there will be more seedlings joining them this week as warmer weather is in the forecast.


Spinach Seedling
Emerging on schedule!  Hopefully others will follow!

Sugar Snap Pea Seedling!  Woohoo!


I also noticed that my arugula is flowering.  Since I have never grown arugula before I was surprised.  The temperature has not been out of the 70’s and only that for a day or two.   If you have grown arugula and have any insight you could share I would appreciate experienced advice.  I removed the flowers and other buds hoping to keep it from going to seed early.  I need to do some more research on arugula.  

Dry Soil 

I am having some problems with some of my soil being too dry.  It just will not retain any moisture after a rain or watering.   After making my dirt by Mel's mix recipe, I realized I had not use enough peat moss.  So I added peat moss to some of the 1x1 squares when I planted in them.  I think I may have my compost to peat moss to vermiculite ratio altered.  I am going to try and correct the problem by adding more compost when I replant the summer crops.  The 1x1 squares that have the original Mel's Mix soil seem to hold a little more moisture after watering, but not as much as I would hope.  I tried my best to follow Mel's recipe, but I did some guessing when it came to cubic feet on some of the bags that were sold by weight. 

Saturday, March 9, 2013

Blessed with Rain

My garden is currently being blessed with rain.   God is so good!   I am afraid I have not done a good job keeping my seeds moist.  Between that and the cooler weather I may not have my seedlings emerging on schedule.   I have escaped to South East OK for a little R&R for a few days.  Had some great friends come to visit and see our little abbey in the woods.   Hope my garden is doing well without me.   I am really looking forward to getting back home to see if by chance I do have some seedlings emerging. 

Wednesday, March 6, 2013

New Planting and Harvest Record


I have created an excel spreadsheet to keep up with my garden records. Check it out from time to time to see my square foot garden's progress.


I notice that some people are posting their garden plans on their blogs. I tried drawing up plans before I started, but when it came time to plant, I found it more creative for me to plant a square and then to decide what to plant in the next square. Mel recommends planting every square with a different crop, but I think I like having several squares together of the same plant. I feel having the same plant in consecutive square will make harvesting will be easier. I may plant more than Mel might suggest because I like to preserve the harvest to eat lat
 

Tuesday, March 5, 2013

Protecting Crops from Cold Weather


SFG March 4

Weather in Texas Continues to Be Cold

These lingering cold temperatures may be helping some of my early spring crops, but it is requiring more effort to keep the plants from freezing.  Plastic cover goes on at night and off in the morning.  Back on again at night and off again in the morning.  There have been few nights when I did not have to cover my garden in the past several days.   This past weekend I decided to build a frame from PVC pipe according to Mel’s guidelines.   It was simple, affordable and took very little time.  

For the three current squares that I have planted, we purchased six ½ inch PVC pipe 10 foot in length. We slipped the PVC pipe into opposite corners of each 4x4 square and attached them at the top where they crossed with a zip tie.  It was that simple.   I thought I had enough plastic to cover all three squares, but I ran a wee bit short.   One of the squares is only partially planted so we were able to cover the planted squares with what was left of my plastic.   


We are using bricks, rocks, and 2x6 wood scraps
to keep the plastic from blowing in the wind


Hopefully we will see warmer night temperatures soon, but this week’s forecast doesn’t seem promising.  

Thursday, February 28, 2013

Planting Early Spring Crops


Last Saturday I had hoped to plant more early spring crops, but the Texas weather would not cooperate.  It was cold and super windy.   Cold enough to keep me inside the house!  Sunday, however, was a beautiful day with sunshine and warmer temperatures.   I usually spend most Sunday afternoons resting, but I sacrificed my nap to work in my SFG. 


I planted several squares of salad greens including several types of lettuce, spinach, and mesclun.  I purchased three varieties of lettuce starter plants at a local garden center -- Red Leaf lettuce, Bibb lettuce, and arugula.   I planted Burpee Mesclun Classic Mix from seeds.  Mesclun is a variety of salad greens often sold in supermarkets as spring mix.   The seed package indicates that there are eight different varieties of salad greens Prize Leaf Lettuce, Oak Leaf and Red Salad Bowl Lettuces, Green Ice Lettuce, Arugula Rocket, Endive, Curled and Radicchio Red Verona, Corn Salad Mache, and Curled Chervil.
 
 
Arugula planted four per square. 
 
 
Red Leaf Lettuce planted four per square.
 
 
Bibb Lettuce planted four per square.
 

The back row (Sorry, Mel,I know you hate that word.) is sugar snap peas
 planted eight per square.


One of the SFG crops I am most excited about is sugar snap peas.   I found some starter plants at the local garden center.  Since Mel, my go to guy for square foot gardening, recommends planting seeds rather than growing starter plants indoors, I decided to do a little experiment.  I have planted one square with the starter plants and three squares from seeds.   The seed package promises only 64 days to maturity.   I hope the weather doesn’t get too hot too soon and I get a great harvest.        

 I also planted two more squares of onions.  This is in addition to the two squares I planted two weeks ago.  Replanting every two weeks will extend the length of my harvest season.   Being the southern girl that I am, I can hardly wait for the harvest.   Freshly picked sweet green onions go great with a country girl’s favorite comfort foods.  What’s for supper Grandpa?   Red beans, fried potatoes, hot water cornbread, and green onions.   Yum! Yum!  
Sweet Onions planted 16 per square.
 
Other crops added to my SFG included two types of parsley, flat and curled as well as some onion chives.   Has anyone ever tried to preserve chives by drying them? I would sure like to know if this can be done and if I need a dehydrator. 
My initial three 4X4 squares are just about full.  I have left a few squares for potatoes and some early tomatoes, but I will have to be patient and wait for warmer days. 

As I put this post to bed, I am hearing more cold weather is forecasted.   Looks like there is no way around getting the PVC pipe and building the  mini greenhouses for each square.  

Thursday, February 21, 2013

Protecting my SFG from the Cold


In my eagerness to get my SFG growing, I may have planted a little early.  But here in Texas when spring arrives, the temperature warms up quickly.  I wanted to make sure there was time for my early, early, spring crops to mature before it gets too warm. 

Since my last post, the weather in Texas has turned COLD and RAINY.   Last weekend the temperature was scheduled to drop below freezing, so I rushed to protect my baby plants!   With a square foot garden this was a simple task.   In his book Mel explains how to make some simple frames from PVC pipe.  I was short on time and did not have time to make the frames. Because my plants are still young I was able to cover all three squares with a piece of 3 mil plastic.  We weighted the platic down with some scrap 2X6 blocks so it wouldn’t blow away.   It worked perfectly.

We had to put the plastic back on tonight.  Freezing temperatures forecast for early tomorrow morning. 

Come on spring!  I am ready for some dry and warmer weather so I can plant more squares.   I hope to plant some sugar snap peas, spinach, lettuce, and radishes as soon as we have a good day.


Monday, February 11, 2013

Beginning the Journey

I would like to invite you to come along with me on my square foot garden journey.   My journey actually began years ago.  I created my first square foot garden in Trout Creek, TX about 30 years ago.  It was a success, but we moved away and I got side tracked for many years with row gardening.. SHHHHHHHHHH! Don't tell Mel!   Worse still, I have been on vacation from serious gardening for many years.  So, how did I get back on the right path.  Simple,  I was waiting on my husband one day in a bookstore and I found Mel's new updated Square Foot Garden Book.  I became so interested in the improvements and changes that I missed four phone calls from my husband.   I sat reading Mel's book while my husband searched the whole shopping center for me.   Yes, my phone was on vibrate. 

 Needless to say I was hooked once again on square foot gardening and my husband has actually come along for the ride!

  The next stop on my journey was to purchase a digital copy of All New Square Foot Gardening, by Mel Bartholomew on my iPhone.  I have read and reread it already, making plans for my new square foot garden.  One of my favorite parts of the book was the introduction where Mel tells how he designed the square foot gardening method.   I actually saw Mel's gardening show back in the 80's on public television. 

I have already gone quite a distance on this journey and need to share some of the sights we have already visited.  

Saturday - February 2

Building the boxes

My husband built the 4x4 square foot boxes a couple of weekends ago.   He used some old wood we had and needed to use on a good project.   The boards were old and a little warped, but it saved us some money and helped the environment.    So my square foot garden may not be a perfect square, but it looks pretty close.  

Saturday - February 9

Setting up the first three boxes

This past weekend, in spite of cold weather and threatening rain, I began to set up my square foot garden.  We just moved into a new house and the yard is still in need of landscaping.  The yard hosts lots of Bahia grass. So even though Mel says it isn't necessary, I tilled the area of the yard where I decided to put my SFG.  About this time my husband arrived to help.  The rain was getting closer so we were in a race to beat the weather.   We set three boxes in a row three feet from our back fence.   I got busy and stapled the weed block inside the boxes and up the sides.   I am worried about that Bahia grass.   I will be pleasantly surprised if the week block works.   I did not purchase the commercial grade, but I bought Scotts Pro Weed Block from  Home Depot.   I decided to double the weed block in my SFG.   We shall see if we get weeds!  

Making Dirt

While I stapled weed block, my husband made dirt.   We followed Mel's recipe.  We are starting with three boxes so we needed 24 cubic feet of dirt.   We used 8 cubic feet of coarse vermiculite, 8 cubic feet of peat moss, and 8 cubic feet of compost.   This is some amazing dirt.   Use a big tarp.   Ours was too small and it made mixing it more difficult. 


Monday, February 11

After a full day of benchmark testing middle school students, coming home to my SFG was cheap therapy!
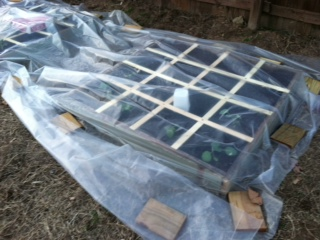
Building the Grids

Today we built the grids for three of the boxes.   We connected the grids where they intersect with tiny wood screws.   A couple of the wood laths split, but overall  it worked quite well.

Planting the Early Crops

It is probably too early, but I planted some of the early spring crops just before dark.   My SFG has 6 broccoli, 6 cabbage, 6 brussel sprouts, and 32 onion plants in the ground waiting for the coming rain.   I have never grown broccoli or brussel sprouts so I am anxious to see the outcome.   I was sad that it was too dark by the time we finished today to get a picture.   Maybe tomorrow. 

Thanks for coming along on my SFG Journey! Come on back for futher adventures.